당신은 주제를 찾고 있습니까 “daenerys qarth dress pattern – GOT: Making Daenerys’ Blue Qartheen Gown Part 1“? 다음 카테고리의 웹사이트 https://ro.taphoamini.com 에서 귀하의 모든 질문에 답변해 드립니다: ro.taphoamini.com/wiki. 바로 아래에서 답을 찾을 수 있습니다. 작성자 Megan’s Research 이(가) 작성한 기사에는 조회수 272회 및 좋아요 9개 개의 좋아요가 있습니다.
Table of Contents
daenerys qarth dress pattern 주제에 대한 동영상 보기
여기에서 이 주제에 대한 비디오를 시청하십시오. 주의 깊게 살펴보고 읽고 있는 내용에 대한 피드백을 제공하세요!
d여기에서 GOT: Making Daenerys’ Blue Qartheen Gown Part 1 – daenerys qarth dress pattern 주제에 대한 세부정보를 참조하세요
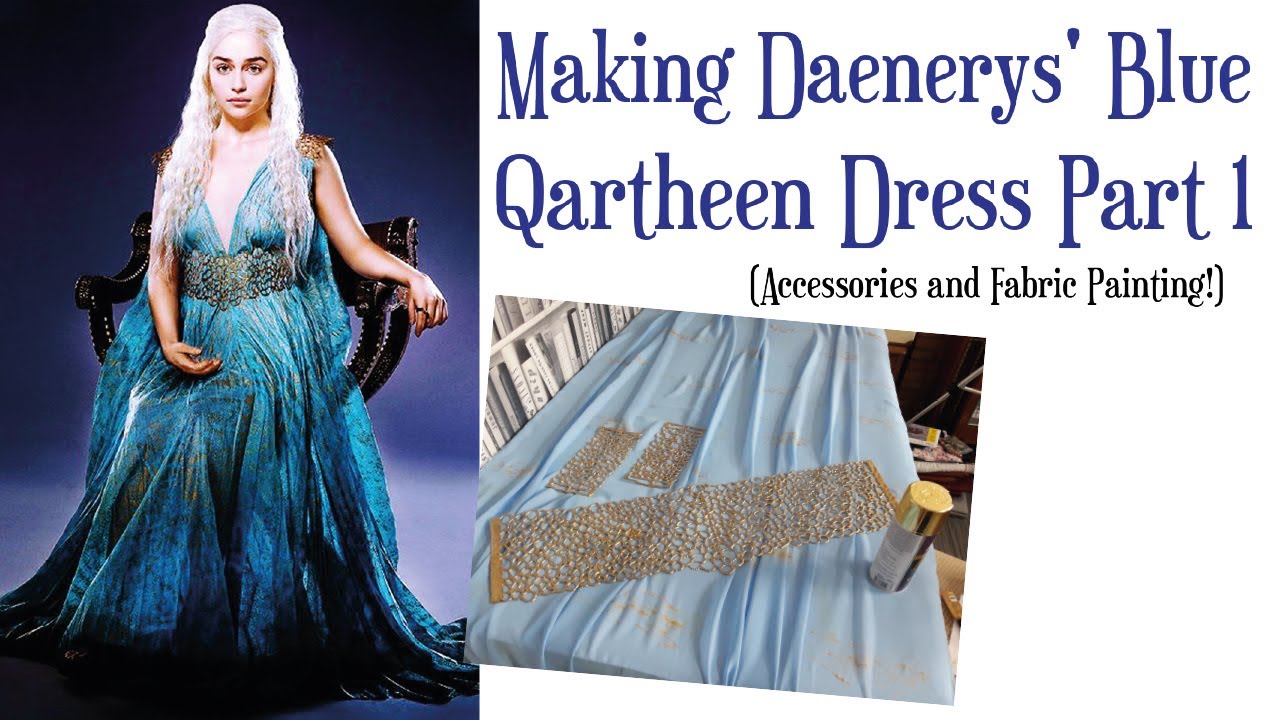
This is footage of me creating a Game of Thrones costume. Specifically, Daenerys Targaryen’s blue gown, given to her by Xaro Xhoan Daxos when she arrives in Qarth in Season 2 of the TV programme. This is only part one of the video footage I will collect, which includes making the accessories for the dress and fabric painting as well as including some interesting facts I found! Of course, they are relating to Game of Thrones and Daenerys.
Disclaimer: This video is merely of me working my way through trying to complete it, along with mistakes that I have made, rather than an actual tutorial.
If you want to see more of what I sew, you can visit my Instagram account:
https://www.instagram.com/meganalicehunt15/
Materials:
Hi-Multi Chiffon in Pale Blue – https://www.cheapfabrics.co.uk/products/plain-chiffon-sheer-fabric?variant=30351513256045
Cosmic Moon – Metallic Fabric Paint – 30ml – Gold – https://www.amazon.co.uk/gp/product/B07RMK594T/ref=ppx_yo_dt_b_asin_title_o01_s00?ie=UTF8\u0026psc=1
400ml Brilliant Metallic Gold Spray Paint – https://www.amazon.co.uk/gp/product/B001W03PLS/ref=ppx_yo_dt_b_asin_title_o07_s01?ie=UTF8\u0026psc=1
Mini Hot Glue Gun Sticks (60 Pack) – https://www.amazon.co.uk/gp/product/B087D7TKML/ref=ppx_yo_dt_b_asin_title_o05_s00?ie=UTF8\u0026psc=1
Mini Hot Glue Gun – https://www.amazon.co.uk/TOPELEK-Quickly-Heating-Repairs-Plastic/dp/B06XFQDXTR/ref=sr_1_1_sspa?dchild=1\u0026keywords=mini+hot+glue+gun\u0026qid=1596995048\u0026sr=8-1-spons\u0026psc=1\u0026spLa=ZW5jcnlwdGVkUXVhbGlmaWVyPUEyV0ZVWjFUQU5QSjQyJmVuY3J5cHRlZElkPUEwNjA5MjA0M0VYRUxVM1FORk1aNiZlbmNyeXB0ZWRBZElkPUEwOTA4Mjg2MTdWSkc5RTVWVkRVNiZ3aWRnZXROYW1lPXNwX2F0ZiZhY3Rpb249Y2xpY2tSZWRpcmVjdCZkb05vdExvZ0NsaWNrPXRydWU=
Beautiful music is courtesy of the free YouTube music library, Maestro Tlakaelel by Jesse Gallagher.
daenerys qarth dress pattern 주제에 대한 자세한 내용은 여기를 참조하세요.
Tag: daenerys qarth dress – Fabric & Fiction
This dress is an interesting one to recreate. The shape is very simple, but the simplicity is a bit deceptive. This is not so much about dressmaking as about …
Source: fabricnfiction.com
Date Published: 8/9/2022
View: 3642
Daenerys Qarth Dress – Etsy
Check out our daenerys qarth dress selection for the very best in unique or custom, handmade pieces from our dresses shops.
Source: www.etsy.com
Date Published: 8/12/2021
View: 1040
주제와 관련된 이미지 daenerys qarth dress pattern
주제와 관련된 더 많은 사진을 참조하십시오 GOT: Making Daenerys’ Blue Qartheen Gown Part 1. 댓글에서 더 많은 관련 이미지를 보거나 필요한 경우 더 많은 관련 기사를 볼 수 있습니다.
주제에 대한 기사 평가 daenerys qarth dress pattern
- Author: Megan’s Research
- Views: 조회수 272회
- Likes: 좋아요 9개
- Date Published: 2020. 8. 15.
- Video Url link: https://www.youtube.com/watch?v=61gqMfg8LXQ
Daenerys Qarth Dress Tutorial
At first I wasn’t sure if I should get silk chiffon or habotai. I desided on the habotai as it is a beautiful sheer fabric, but not as transparent as chiffon.
I didn’t make a real pattern, I just cut the fabric into 7 pieces:
4 pieces for the skirt (length measure from waist to bottom, I made the back pieces a bit longer to give it ab bit of a train, width: I just took the fabric width which was 45″/114 cm)
2 pieces for the “top” (length circa from waist to shoulder, rather make it a bit longer, you can cut it later, width, I just cut the fabric in half so the pieces are about 22.5″/57 cm)
1 piece for the train, mine is about 2 yards/1.8 meters long and 45″ wide (however If I would have hade enough fabric I would have sewn two of this pieces together to make it wider….)
daenerys qarth dress – Fabric & Fiction
The project I was hoping to have done a month ago is finished! Daenerys’ Qartheen dress is officially ready for the runway.
Last week, I described the process of making the belt and shoulder pieces out of brass sheets. You can read all about that here.
This dress is an interesting one to recreate. The shape is very simple, but the simplicity is a bit deceptive. This is not so much about dressmaking as about pure fabric manipulation. There is no structure to the dress, it all falls straight down from the shoulders and is gathered in by the belt. People recreating the costume get a special treat with this one because there is a shot of the dress before Dany gets into it, and you can see the structure (or lack thereof) of it off of a body. The trick is getting enough volume of fabric, and then controlling in a way that doesn’t turn it into a giant messy poof.
Before I get to that though: the fabric. The dress is sheer, but it is actually quite stiff, which is really apparent when Dany is walking. The dress doesn’t flow around her, it swings and is stiff enough that it appears almost heavy despite how transparent it is. In order to get both the crispness and the sheer, I got 12 yards of undyed silk organza from Dharma Trading Co. My boss, Heather, ended up dying it for me, since she has more experience dying, and it’s a tricky color and fiber. The color is especially hard, since it looks quite different in different lightings on the show. So is the color we ended up with; sometimes I look at the finished color and think it’s too aqua, and then I see it in a different light and think it’s perfect. You can see the variation in all the photos later in the blog. It’s very strange.
The color isn’t all. Once it was dyed, I stamped the gold pattern into it using the base of my palm and a little wire spiral I made. The pattern is pretty loose: there are some sort of wavy stripes in places, and in other places the gold is all over. To try to replicate how the pattern falls on the dress, painted the fabric with stripes down the center and with more abstract gold at the edges. As I went, I stamped a few spirals here and there. I already had an idea of how the dress was going to go together, and I thought that would give me the best pattern placement.
Since I was stamping it all as one piece, I needed somewhere for all that fabric to go as it dried, my solution was a laundry drying rack on top of my table:
Now comes the volume, and how to control it. Every piece of the dress started out as rectangle the width of the fabric, there were no shaped pieces at all. Each piece was doubled up so that there were two layers of fabric. The front is made of two of these pieces, one hanging from each shoulder, so I started by pinning the shoulder pieces to my dress form and arranging the fabric in pleats so that it was the same length as the bar at the bottom of the shoulder.
I pleated this very carefully instead of gathering it because the original dress has a very clear permanent pleat in the fabric all the way down: this is what controls the large volume of fabric without making it look like a tutu. The pleats at the shoulder had to be stacked on top of one another in order to fit all that volume into about four inches. After that, it was just a matter of following the pleats down, pinning as I went, and arranging them over the shape of the dressform. It wasn’t particularly difficult, but it was time-consuming. The result, however, was worth it. You can really see in the process photos the difference between pleating the fabric and leaving it loose.
Once the pleats were all pinned down, I did something that almost made me throw up in terror: I steamed silk. Because the gold already gives the fabric a mottled look, I decided that any watermarks probably wouldn’t show up too much. I got lucky in that it also didn’t de-lustre the silk, so it still has that lovely silken shimmer.
At this point I also sewed the fronts securely to the shoulder pieces, though apparently I didn’t get any pictures of that.
The back panel is one piece (two layers).
The dress also has a cape-like piece that hangs from the back of the shoulder pieces. It didn’t need quite as much volume as the front, so I made each side out of a single width of fabric folded in half lengthwise.
The cape was done in the same way as the front except that it was easier because there was half the amount of fabric and no boobs to contend with.
I hemmed it using the roll-hem feature on my serger. I’ll tell you what, I don’t need a serger that often, but when I do it is invaluable. There were eight widths of the fabric that needed to be hemmed in total, and I think it only took me about half an hour.
Since I already had the belt done, the only thing left was to make the bead strings that hang from it. Most of the beads I either had lying around or bought from Joann, but I ordered the cicadas from DIYbeads4u on Etsy. They got here yesterday and I was able to finish everything up. I chained the beads together using eyepins that I bought at Joann. I made the hooks out of the eyepins as well because waste not, want not.
Brandon cut these shapes out of particleboard for me, and I painted them.
They get nice little tassels of beads hanging from them so that they really fly around and sparkle when you move.
And that was it. I just got pictures on the dressform for now, because I want to save the whole thing until I can get some good pictures on me (and because I’m still waiting for the stick-on bra and Spanx shorts to arrive). The dress looks at least three different colors in just these photos, and I took all of them in the same place with the same light.
It will be appearing in public for the first time at Lexington Comic and Toy Con in a couple of weeks! If you want to see photos from the event, like Fabric & Fiction on Facebook, or follow me on Instagram @fabricnfiction!
Hannah
Update: Here are a few amazing photographs by Ben Marcum. There is nothing more fun that doing a shoot with him! If you’re in Louisville and need new headshots, or a stunning portrait that makes you feel better about yourself than you ever had before, he’s the man to go to!
Daenerys Qarth Dress
Public collections can be seen by the public, including other shoppers, and may show up in recommendations and other places.
My New Daenerys Targaryen Costume in Qarth!
Hello all! I’m back again with an all new Daenerys costume! This one was the hardest by far! Khaleesi dresses fancy in Qarth! The Game of Thrones has such amazing costumes designers!
With this costume, as with the last Khaleesi, I decided to make my wig. The first wig I made for the Daenerys costume last year didn’t fit quite right. So, I scoured the wig supply shops looking for the perfect color hair tracks, and I found them! Somehow I was able to find hair that is one shade lighter than 613 called white, but isn’t exactly white. Its also able to be heat styled because its a mix of human and synthetic. I bought a hair net and started to sew. Somehow I was able to complete it in a reasonably shorter period of time than my last wig. I still had to style it with my triple-barrel wave curling iron.
Here is another image of Daenerys Targaryen and one of her Dothraki from the Game of Thrones!
I had to make my pattern for the blue dress that is underneath the metal-like armor. Since I couldn’t find the perfect fabric for the piece, I actually had to modify the best fabric I could find. I sewed in lots of vertical stitching using silver thread to compliment the silver lining underneath. I really feel that it gave the piece a unique feel.
The hardest part of the costume was making Khaleesi’s faux metal piece. This seems to be the style worn by many people in Qarth. I started out making the pattern on my body-form. Then I cut it out of white foam. All of the tiny cut-outs in the foam must have taken me at least 6-8 hours to complete. Once they were cut, I then had to hand-sew each piece together with gold thread. I believe the next one I make will be out of leather. Once assembled, there was the matter of painting it. I used a combination of Rub and Buff and acrylic paint. I can’t believe how amazing it turned out! It actually looks like metal in photos!
Daenery’s shirt and skirt topper are made from one big suede skirt I found at my local thrift store. I modified a lot for this costume, and I feel like it worked out great! The only thing I still really need for this costume is a better pair of boots. Khaleesi wears light grayish-brown boots with buckles. Hopefully I will be able to find them soon!
I will be working on more costumes from her trip to Qarth coming soon! They will be the purple version of this one, the long teal dress, possibly her off-white dress and the costume she wore upon arrival to Qarth. The latter is very similar to the costume from season 1, and here is a link to my article I wrote about the season 1 costume:
http://www.aradani.com/costumearticles/my-daenerys-targaryen-costume-for-dragoncon/
Once I am able to schedule a photo shoot, I will be posting better pictures of Daenerys Targaryen that have high resolution details of every part of the costume! Here is one more photo I have from Dragon*Con! I found a great John Snow! Oh how I love The Game of Thrones!
Check out our other great costumes:
http://www.aradanicostumes.com/
http://www.aradanicostumes.com/horse_queen_dress?keyword=horselord&category_id=0
How I made My Daenerys Blue Qarth Dress
The Dress:
The dress is a simple skirt with an elastic waist band , with two long panels that double as the top and the capes.
Hopefully this drawing helps explain:
Then the gold pattern was spray painted on with a lace stencil.
The Shoulders:
The shoulders are a worbla frame with hot glue designs on top secured with craft wire, it is strong enough to hold the capes.
The Belt:
The belt is cut out of craft foam and reinforced with a hot glue layer, then painted gold.
The Beads:
The beads are all polymer clay joined together with craft wire.
Full photo shoot here
키워드에 대한 정보 daenerys qarth dress pattern
다음은 Bing에서 daenerys qarth dress pattern 주제에 대한 검색 결과입니다. 필요한 경우 더 읽을 수 있습니다.
이 기사는 인터넷의 다양한 출처에서 편집되었습니다. 이 기사가 유용했기를 바랍니다. 이 기사가 유용하다고 생각되면 공유하십시오. 매우 감사합니다!
사람들이 주제에 대해 자주 검색하는 키워드 GOT: Making Daenerys’ Blue Qartheen Gown Part 1
- sewing
- tutorial
- GOT
- Game of Thrones
- Daenerys
- Dany
- Targaryen
- Mother of Dragons
- costuming
- costume
- cosplay
- qarth
- season 2
- costube
- cosplayer
- game of thrones cosplay
GOT: #Making #Daenerys’ #Blue #Qartheen #Gown #Part #1
YouTube에서 daenerys qarth dress pattern 주제의 다른 동영상 보기
주제에 대한 기사를 시청해 주셔서 감사합니다 GOT: Making Daenerys’ Blue Qartheen Gown Part 1 | daenerys qarth dress pattern, 이 기사가 유용하다고 생각되면 공유하십시오, 매우 감사합니다.